Wednesday, February 16, 2011

AdSense between posts

AdSense have always stressed that the most effective position for ads are within content, so when I found out you can insert AdSense between posts directly via the LAYOUT, I immediately thought I could insert the ads in the middle of a post, which is impossible to do up to now. Unfortunately, that insert ads in between 2 posts, not in the midddle of a post, something I had been trying to do for a long time. You can actually do this by messing with the template. Refer to Incorporate AdSense within the content (click BACK button to get back to this page).

The way to do direct from Blogger LAYOUT it is very simple. Sign into Blogger, which will get you into the Dashboard with a list of all the blogs you have in that Blogger account. In the section for "Blog posts", usually in the middle of the LAYOUT (may be in a slightly different position if you use non-standard Blogger templates):


Click EDIT (highlighted with a red circle). You will get a "Configure Blog Posts" "pop-up".


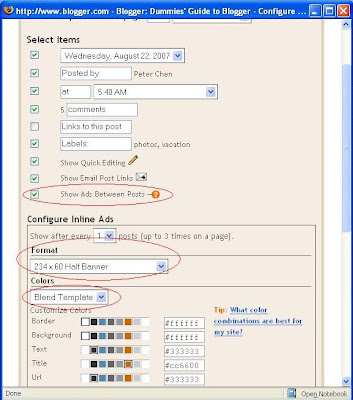
Tick "Show ads between posts", select your format by clicking on the down arrow or just leave it as the default half-banner and chose you ad colors or just leave it as the default "Blend Template" which is advisable (all 3 highlighted with red circles).

Then just scroll down and click "Save Changes". Now you don't have to worry about violating AdSense policy as this is done via cooperation between Google AdSense and Google Blogger. However, if you want the AdSense withing the post, you will still have to depend on the hack described in Incorporate AdSense ads within posts and wrap text around them (click BACK button to get back to this page.

The only thing to note is that if you had applied for your AdSense account direct from Blogger, there is nothing extra to do. If you have got your AdSense account via some other means, and this is the first time you are adding AdSense ads direct from Blogger, you may be asked to grant Blogger access to your AdSense account, which I believe is perfectly safe to do so.

One final thing. Just to make sure that the ads have the same publisher's ID, at the blog with the ads between posts, I click VIEW > PAGE SOURCE to see the page source of that webpage, and this is what I found:


The "pub-12345....." was the same as my AdSense publisher ID (figure altered for security) thus assuring the ads displayed are actually "mine".

How To Disable Error Reporting in Windows XP


The error reporting feature in Windows XP is turned on by default but you may want to disable error reporting for privacy concerns, if you're not connected to the Internet all the time, or to simply stop being alerted by it.

Error reporting works by prompting you after a critical error in the operating system or in other programs and asking permission to notify Microsoft about it. This way, Microsoft can gather technical information about serious errors from millions of users, helping them develop fixes and service packs.

If you'd like to disable error reporting, follow the easy steps outlined below.
Difficulty: Easy
Time Required: Disabling error reporting in Windows XP usually takes less than 5 minutes
Here's How:

Click on Start and then Control Panel.

Click on the Performance and Maintenance link.

Note: If you're viewing the Classic View of Control Panel, double-click on the System icon and skip to Step 4.

Under the or pick a Control Panel icon section, click on the System link.

In the System Properties window, click on the Advanced tab.

Near the bottom of the window, click on the Error Reporting button.

In the Error Reporting window that appears, choose the Disable error reporting radio button and click the OK button.

Note: I would recommend leaving the But notify me when critical errors occur checkbox checked. You probably still want Windows XP to notify you about the error, just not Microsoft.

Click the OK button on the System Properties window

You can now close the Control Panel or Performance and Maintenance window.
Tips:

Not a Windows XP user? See How Do I Disable Error Reporting in Windows? for specific instructions for your version of Windows.

Make Windows XP Shutdown Faster than ever

You can make your shut down process a bit faster by the following tweak.

Steps: (download the registry file)

1. This step is very important.
Export (right click > Export) the following keys and save it to a safer place.

HKEY CURRENT USER\Control Panel\Desktop
HKEY_LOCAL_MACHINE\SYSTEM\CurrentControlSet\Control

2. Open Notepad, copy and paste the following to the Notepad.

Windows Registry Editor Version 5.00

[HKEY_CURRENT_USER\Control Panel\Desktop]
"AutoEndTasks"="1"
"HungAppTimeout"="1000"
"WaitToKillAppTimeout"="2000"


[HKEY_LOCAL_MACHINE\SYSTEM\CurrentControlSet\Control]
"WaitToKillServiceTimeout"="2000"

3. Save the file and close Notepad.

4. Change extension of the file from .txt (text file) to .reg (registry file).

5. Double click open this file and click Yes and the OK .

Remove Autorun Virus Infection - Solution for USB, PC & Laptops.

Nowadays, there is a new problem that is cropping up in almost all schools,colleges, hostels etc. where the malicious Autorun Virus is Creating Havoc by spreading to Laptops and PC through USB Drives etc.
How to Stop the Autorun PC Virus Infection ?

The free Panda USB Vaccine allows users to vaccinate their PCs in order to disable Autorun completely so that no program from any USB/CD/DVD drive (regardless of whether they have been previously vaccinated or not) can auto-execute. This is a really helpful feature as there is no user friendly and easy way of completely disabling Autorun on a Windows PC.


Panda USB Vaccine is a 100% free utility. Its tested under Windows 2000 SP4, Windows XP SP1-SP3, and Windows Vista SP0 and SP1.

Download : Click Here to get Panda USB Vaccine

How to disable Windows XP Boot logo

It is possible to disable the XP splash screen, which will slightly speed up the overall boot process. Be aware that removing the splash screen will also cause you not to see any boot-up messages that might come up (chkdsk, convert … ), but if your system runs without any problems then it should not matter.
  1. Edit boot.ini.
  2. Add ” /noguiboot” right after “/fastdetect”.

Upon restarting, the splash screen will be gone. It can be re-enabled by removing the new switch.

Stop Autoplay In USB Flash Drives By Pressing One Keyboard Button

Most of the virus enters the computer through USB Flash drives, when we open the drive through autoplay the viru is a simple tip with which you can stop autoplay in USB Flash drives. Not only flash drives, it also stops autoplay for CD and DVD also.

While inserting CD, DVD or any flash drive, simply press and hold the Shift key, this will disable the autoplay dialog box. Holding down the Shift key will also block the applications that starts automatically.

Works fine in Windows XP and Windows Vista, Just give it a try and drop your comments.